前言
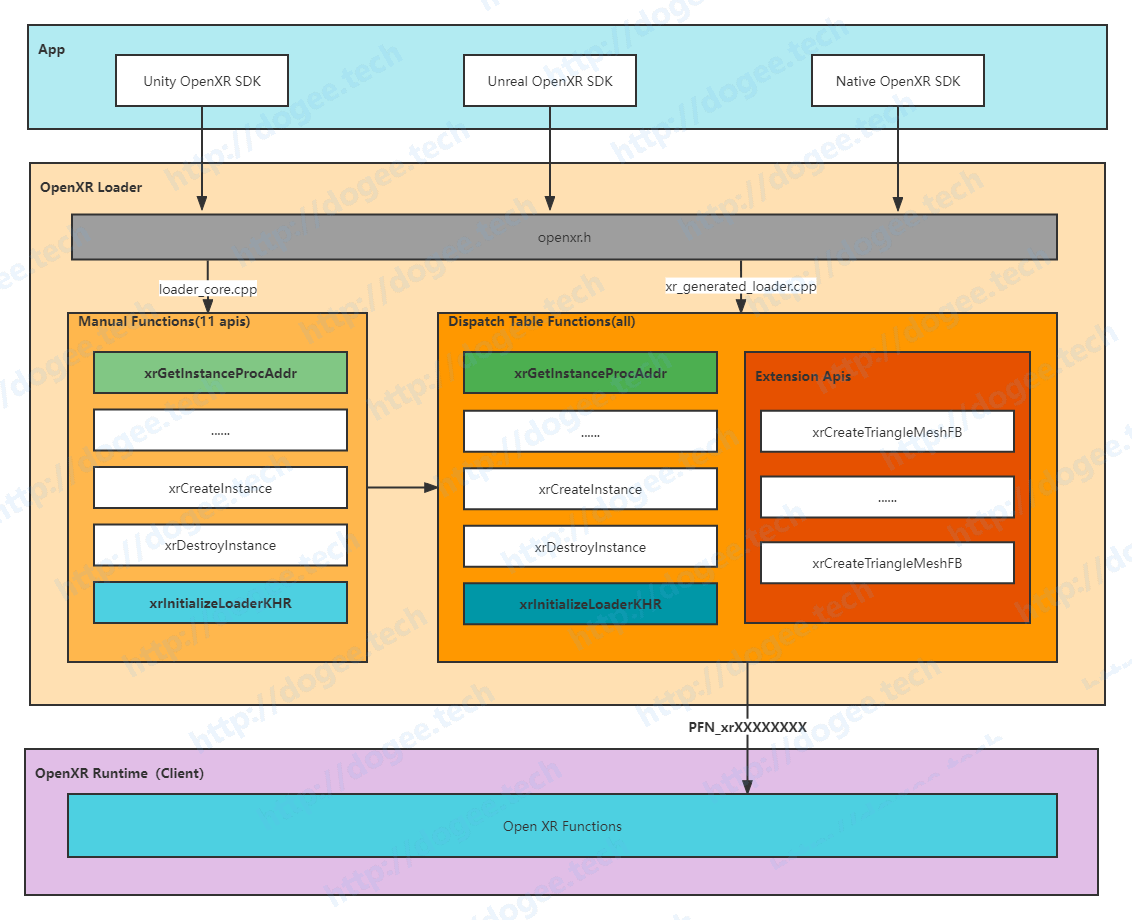
在OpenXR的应用开发中,开发者唯一可以接触到的部分就是loader,根据OpenXR Loader的定义图:
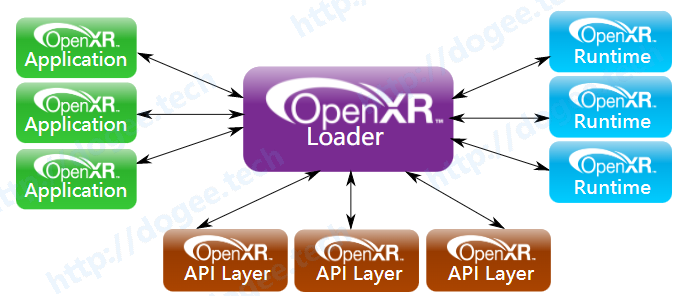
Loader其实是一个承上启下的模块,对下它需要负责去加载Runtime,对上它需要给应用开发者提供openxr.h的具体实现。
api layer的部分在这里不做展开
HelloXR的源码部分还是比较干净的,其中会联动编译openxr loader,因此在学习上价值很大。
代码地址:https://github.com/KhronosGroup/OpenXR-SDK-Source/tree/main/src/tests/hello_xr
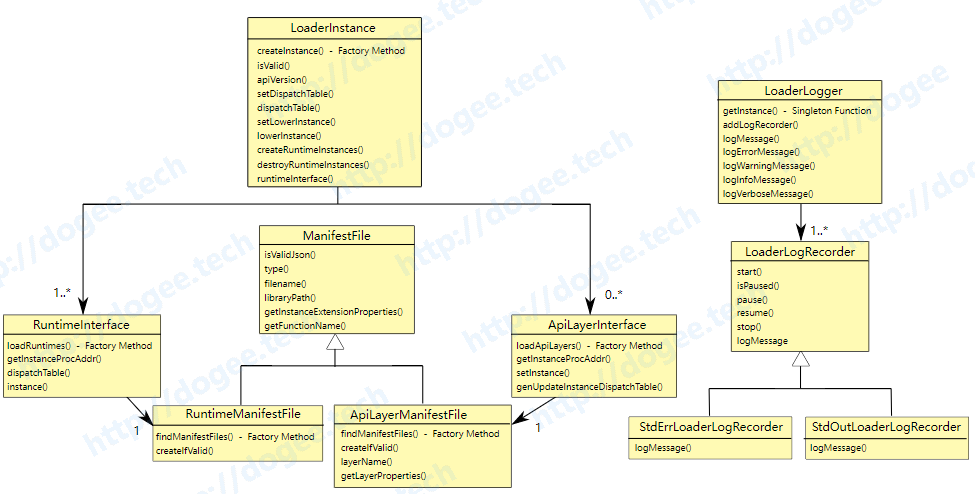
Khronos在loader的spec中也一并给出了Loader的架构设计:https://www.khronos.org/registry/OpenXR/specs/1.0/loader.html#loader-design
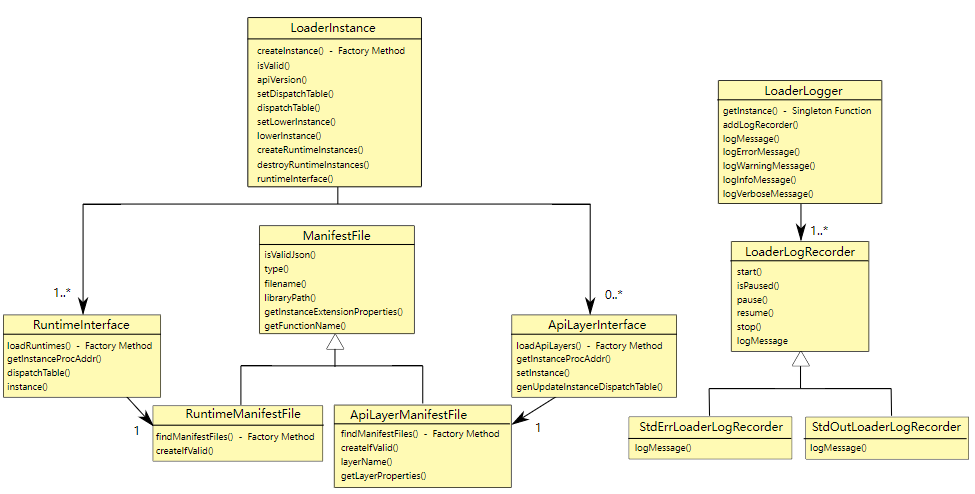
在这张图中,实际我们需要重点关注的是左下角的RuntimeInterface:
- loadRuntimes
- getInstanceProcAddr
- dispatchTable
Trampoline和Terminator
这两个概念在初期很让人混淆,其实分开来看就比较简单:
从流程上看:
Trampoline是应用端调用的入口,即在调用链上第一个访问到的函数。Terminator则是在Runtime调用之前,调用链上最后一个访问到的函数。
也就是说整个loader的入口是Trampoline,而它的出口是Terminator(有部分函数实现会在api layer返回,特例不做展开)。
不过每家的实现也可能不同,所以也并不能一概而论,如下图,基本就囊括了所有的例外情况(Trampoline是永远都会有的)。
因为application没有办法直接调用到runtime的api,所以一定会存在一个
trampoline

HelloXR的流程
整个HelloXR的流程,其实我们可以分为load runtime和call to runtime两个部分。
其实在spec 7.3章节:https://www.khronos.org/registry/OpenXR/specs/1.0/loader.html#manually-implemented-code,其中有一段写的比较隐晦&明确:
Some OpenXR command terminator and trampoline functions need to be manually implemented in the loader.
Command Terminator/Trampoline Reason xrEnumerateApiLayerProperties Both (although terminator should never get called) Loader needs to find and parse the various API layer manifest files. xrEnumerateInstanceExtensionProperties Both Loader needs to find and parse the various API layer manifest files. Also needs to call into runtime and query extensions supported by it. xrCreateInstance Both Loader needs to do all API layer and runtime discovery and processing as well as storing the results. The storage is done inside a LoaderInstanceclass object, which is created during this call.xrDestroyInstance Both Loader needs to call down to all API layers destroying the instance, and then clean up its internal storage (i.e. the LoaderInstanceclass that was created earlier).xrCreateApiLayerInstance Terminator Loader uses this to capture the xrCreateApiLayerInstancechain used to create API layer instances. This terminator will then re-direct the chain back to the standardxrCreateInstancepath.
这一段中特别提到了Some OpenXR command .... need to be manually implemented in the loader。
也就是说,以上的6支api,都是在loader内部有实现的,带着这样的背景知识我们再来看一下源码的call flow。
实际代码中manually implemented的api不止这6支,可以参考:
整个部分的话,其实又可以分为几个步骤,其中manually implemented call简称为MIC,runtime implemented call简称为RIC。
- MIC :xrInitializeLoaderKHR
- MIC :xrCreateInstance
- discover runtime
- load runtime
- init dispatch table
- RIC:xrXXXX
MIC :xrInitializeLoaderKHR
sequenceDiagram
autonumber
main ->>+ loader_core : xrGetInstanceProcAddr
loader_core -->>- main: PFN_xrInitializeLoaderKHR
main ->>+ loader_core : xrInitializeLoaderKHR
loader_core ->> loader_core: LoaderXrInitializeLoaderKHR
activate loader_core
loader_core ->>+ runtime_interface:InitializeLoader
runtime_interface ->>+ LoaderInitData: initialize
LoaderInitData -->>- runtime_interface: XR_SUCCESS
runtime_interface -->>- loader_core: XR_SUCCESS
deactivate loader_core
loader_core -->>- main: XR_SUCCESS
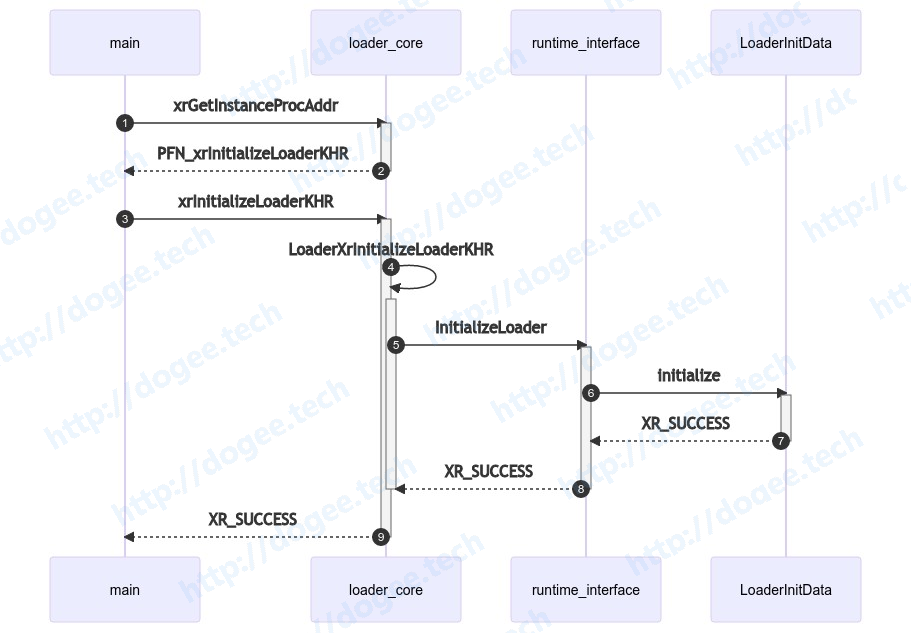
我们直接看一下最后的实际代码:https://github.com/KhronosGroup/OpenXR-SDK-Source/blob/main/src/loader/runtime_interface.cpp#L87
|
|
MIC :xrCreateInstance
discover runtime
在尝试load runtime时,代码中的逻辑是比较简单的。
先从local端的MIC:xrCreateInstacnce开始,这边会在loader代码中尝试做xrCreateInstance
loader中的xrCreateInstance其实是一个wrap,最终的目的是去系统中寻找合适的
libopenxr_runtime.so寻找的过程其实是借助外部
borker或者是active_runtime.json这个部分在android平台上就是借助了content provider:https://www.khronos.org/registry/OpenXR/specs/1.0/loader.html#runtime-discovery
以上就是before load runtime的全部逻辑了,在代码中的流程图如下:
sequenceDiagram
autonumber
main ->>+ openxr_program: CreateInstance
openxr_program ->> openxr_program: CreateInstanceInternal
openxr_program ->>+ loader_core: xrCreateInstance
loader_core ->> loader_core: LoaderXrCreateInstance
loader_core ->>+ RuntimeInterface: LoadRuntime
RuntimeInterface ->>+ LoaderInitData:initialized
note over RuntimeInterface,LoaderInitData: check initial done
LoaderInitData -->>- RuntimeInterface: ture
RuntimeInterface ->>+ RuntimeManifestFile:FindManifestFiles
note right of RuntimeManifestFile: get from broker
(content provider)
RuntimeManifestFile -->>- RuntimeInterface:runtime_manifest_files
RuntimeInterface ->> RuntimeInterface:TryLoadingSingleRuntime

load runtime
发现runtime的过程比较曲折,但是load runtime相对来说就比较简单了。
通过
dlopen函数直接加载到内存通过
dlsym找到runtime library中的对应的函数地址其中最重要的是通过
xrNegotiateLoaderRuntimeInterface函数获取PFN_xrGetInstanceProcAddr因为dlsym只能找到export symbols,所以在monado的源码实现中只有export xrNegotiateLoaderRuntimeInterface
还是很巧妙的一个设计:
获取到runtime so库中的
PFN_xrGetInstanceProcAddr,我们就可以通过它来获取所有runtime中实现的xrXXXXXX函数的地址了。
最后构造了
RuntimeInterface实例,其中参数为:- runtime_library:通过
dlopen获取的so地址 - runtime_info.getInstanceProcAddr:通过
dlsym获取到的runtime so中的xrGetInstanceProcAddr函数地址
- runtime_library:通过
sequenceDiagram
note left of RuntimeInterface: begin with TryLoadingSingleRuntime
RuntimeInterface ->>+ loader_platform: LoaderPlatformLibraryOpen
note right of loader_platform: dlopen
loader_platform -->>- RuntimeInterface : void* so_handle

RuntimeInterface ->>+ loader_platform: LoaderPlatformLibraryGetProcAddr
 with "xrNegotiateLoaderRuntimeInterface"
note right of loader_platform: dlsym
loader_platform -->>- RuntimeInterface: PFN_xrNegotiateLoaderRuntimeInterface
note over RuntimeInterface,loader_platform: function point to runtime : xrNegotiateLoaderRuntimeInterface

RuntimeInterface ->>+ Runtime(Client library): xrNegotiateLoaderRuntimeInterface
Runtime(Client library) -->>- RuntimeInterface: XrNegotiateRuntimeRequest
note over RuntimeInterface,Runtime(Client library): get runtime PFN_xrGetInstanceProcAddr

RuntimeInterface ->>+ Runtime(Client library): PFN_xrGetInstanceProcAddr
Runtime(Client library) -->>- RuntimeInterface: PFN_xrInitializeLoaderKHR

RuntimeInterface ->>+ Runtime(Client library): xrInitializeLoaderKHR
Runtime(Client library) -->>- RuntimeInterface: XR_SUCCESS

note over RuntimeInterface: new RuntimeInterface(runtime_library, runtime_info.getInstanceProcAddr)
getInstanceProcAddr is PFN_xrGetInstanceProcAddr in runtime client library

note left of RuntimeInterface : end of TryLoadingSingleRuntime
init dispatch table
在做完了load runtime的动作之后,其中我们还是处于LoaderXrCreateInstace的函数调用中。
代码层面,这边其实还有一个发现,其实在loader的实现中,决定了一个进程只能有一个instance实例。
|
|
sequenceDiagram
autonumber
main ->>+ openxr_program: CreateInstance
openxr_program ->> openxr_program: CreateInstanceInternal
openxr_program ->>+ loader_core: xrCreateInstance
activate loader_core
loader_core ->> loader_core: LoaderXrCreateInstance
loader_core ->>+ RuntimeInterface: LoadRuntime
RuntimeInterface -->>- loader_core: XR_SUCCESS
loader_core ->>+ LoaderInstance: CreateIntance
note over loader_core,LoaderInstance:LoaderXrTermGetInstanceProcAddr
LoaderXrTermCreateInstance
LoaderXrTermCreateApiLayerInstance
LoaderInstance ->>+  loader_core: LoaderXrTermCreateInstance
loader_core ->>+ RuntimeInterface: CreateInstance
RuntimeInterface ->>+ Runtime(Client): xrCreateInstance
Runtime(Client) -->>- RuntimeInterface: instance
RuntimeInterface ->>+ xr_generated_dispatch_table: GeneratedXrPopulateDispatchTable
note over RuntimeInterface,xr_generated_dispatch_table: setup XrGeneratedDispatchTable
xr_generated_dispatch_table -->>- RuntimeInterface:
RuntimeInterface -->>- loader_core: XR_SUCCESS
loader_core -->>- LoaderInstance:XR_SUCCESS
LoaderInstance ->> LoaderInstance: new LoaderInstance
LoaderInstance -->>- loader_core: XR_SUCCESS
loader_core -->>- openxr_program: XR_SUCCESS
deactivate loader_core
openxr_program -->>- main: XR_SUCCESS
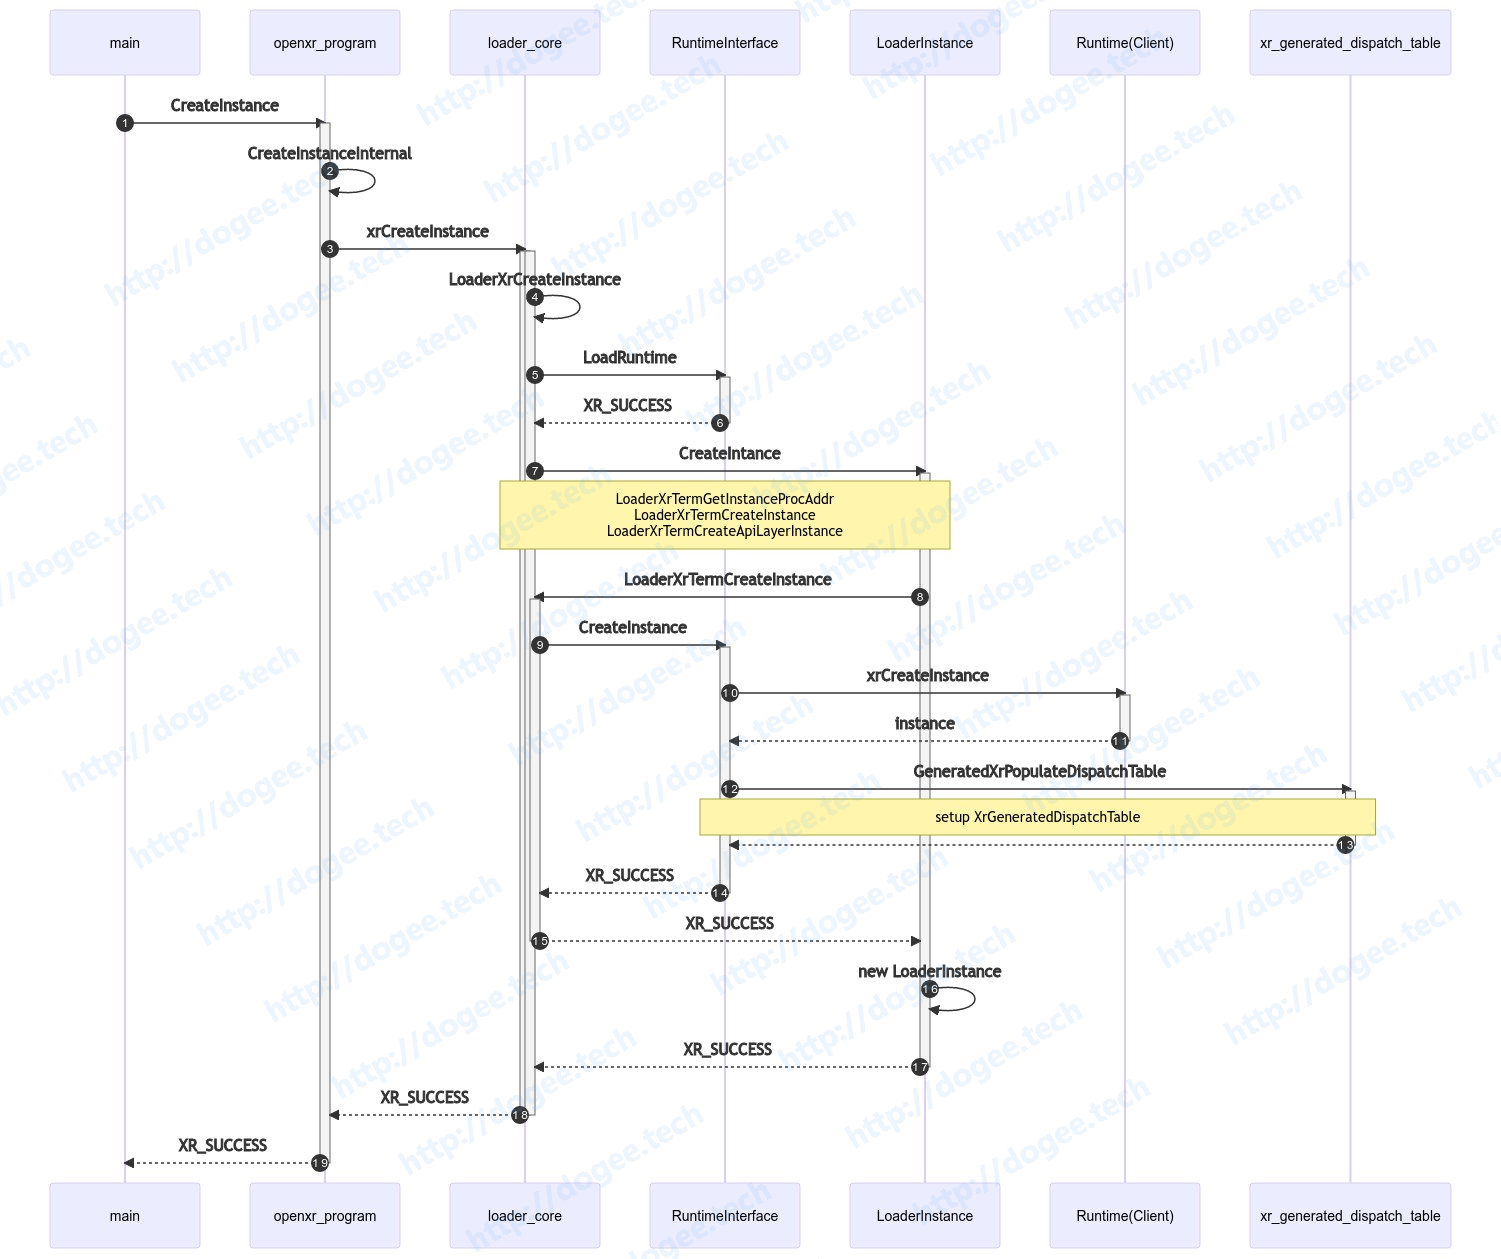
GeneratedXrPopulateDispatchTable的实现是通过py代码生成的,其实就是在使用runtime so中的PFN_xrGetInstanceProcAddr对各个xrXXXX函数做函数指针的赋值。
|
|
RIC:xrXXXXX
这个部分比较简单,需要注意的是大部分的代码其实都是通过py脚本生成出来的,以arm64-v8a为例:
OpenXR-SDK-Source/src/loader.cxx/cmake/debug/arm64-v8a/src/loader/xr_generated_loader.cpp
整体代码风格如下:
|
|
其中DisplatchTable的初始化部分在init dispatch table章节已经介绍过了,所以这边就不再展开了,因为这部分generated代码实际是编译到了loader中,因此当应用调用xrPollEvent的时候,实际就是跑了上面的这一段代码,最终也就是调用到了runtime so中的xrPollEvent的实现了。
总结
至此,整个loader的启动和加载runtime的流程算是告一段落了,其中有两个遗留的点:
一个是broker的作用,这个相对来说比较简单,借助了android本身的content provider的机制,完成了跨进程library共享的功能。
代码细节可以参考:
broker的实现参考:
https://gitlab.freedesktop.org/monado/utilities/openxr-android-broker
第二个是api layer,这个部分的话需要实际demo来配合做一下,从目前代码的结构来看,api layer可以很好的对runtime做解耦。
loader的构思很巧妙,通过dlopen+dlsym+PFN_xrGetInstanceProcAddr的方式,在不暴露过多api的情况下完成各个模块间的桥接,挺有意思的。
一张图总结如下: